🎉Find Prospects and Send Cold Emails & LinkedIn Outbound | All in One Place

SPF DKIM Records: Your Complete Guide to Email Authentication That Actually Works

Table of Contents

Ever sent a perfectly crafted email only to have it vanish into the spam folder? You’re not alone. 16.9% of all emails never reach the primary inbox, and the culprit isn’t your subject line—it’s missing email authentication.

📧 Tired of Email Deliverability Issues?

LinkedIn outbound bypasses spam filters entirely—reach decision-makers with 89% open rates guaranteed

Without proper spf dkim records, your emails are essentially strangers knocking on your prospects’ doors with no ID. Email providers like Google and Microsoft won’t take chances—they’ll send you straight to spam or block you entirely.

This guide breaks down everything you need to know about spf dkim dmarc authentication in simple terms. By the end, you’ll have your domain properly secured and your emails landing where they belong: the inbox.

What do DKIM, SPF, and DMARC stand for in email security?

Think of email authentication like airport security—multiple checkpoints ensure only legitimate passengers (emails) reach their destination.


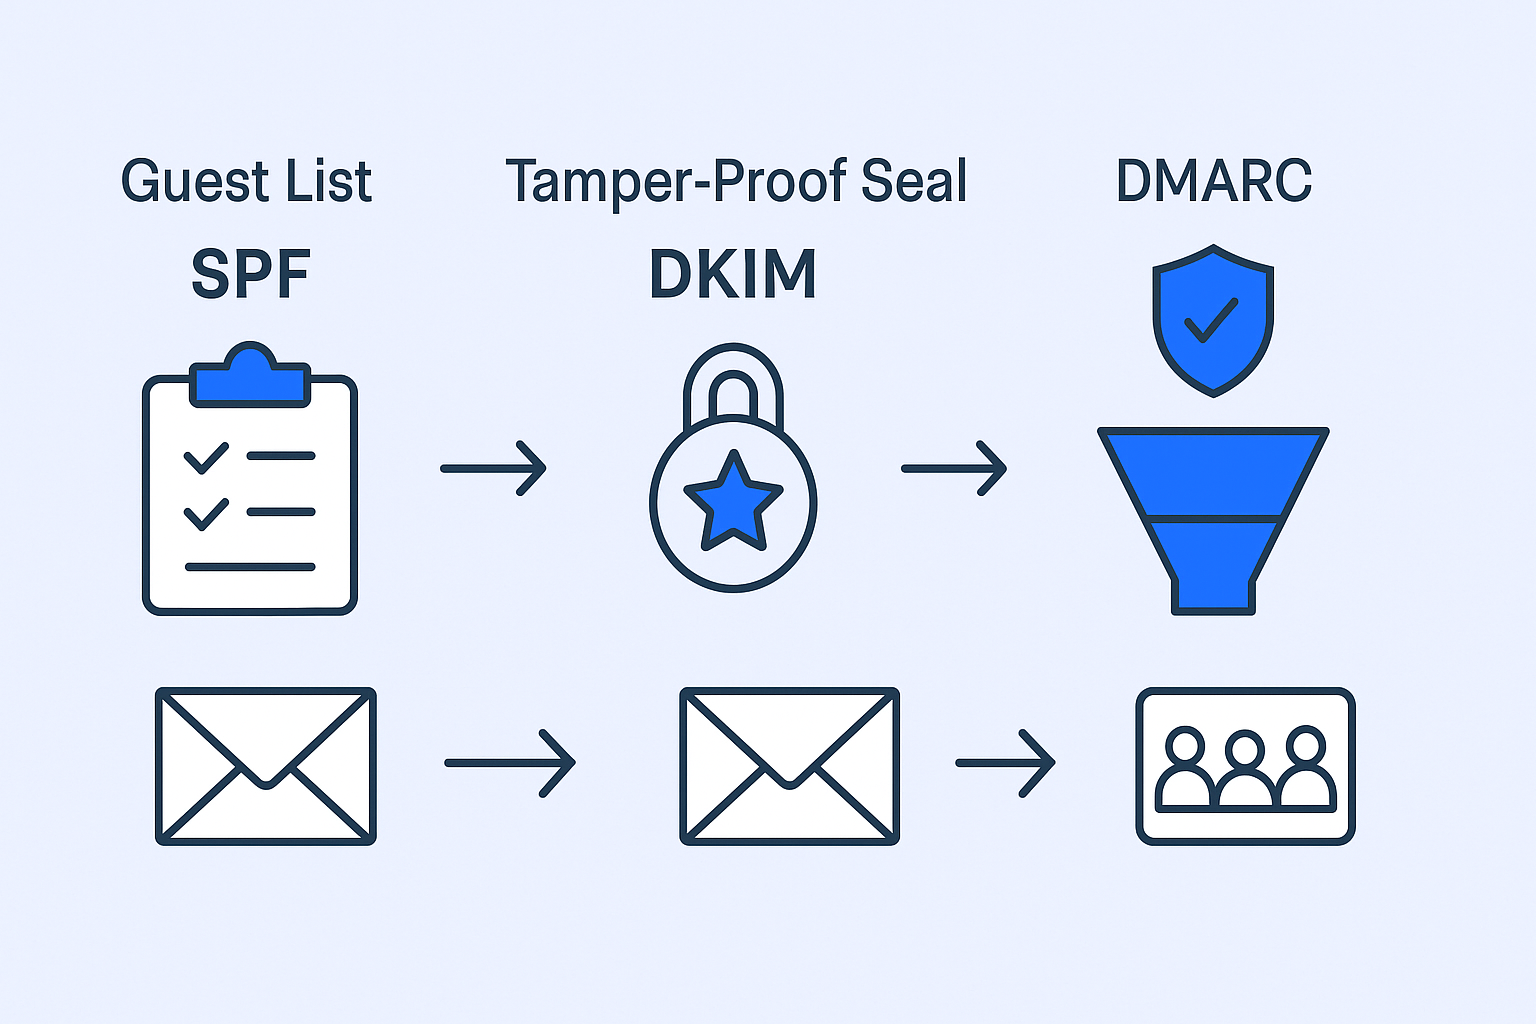
🛡️ SPF (Sender Policy Framework)

SPF record acts like an official guest list at a high-security event. When your email arrives at Gmail or Outlook, they check: “Is this sender on the approved list?”

SPF is a simple text file published in your domain’s DNS settings that lists all IP addresses and services authorized to send emails on your behalf. According to recent studies, 85% of domains have some form of SPF record, but many are misconfigured.

🔒 DKIM (DomainKeys Identified Mail)

DKIM functions as a tamper-proof seal on your email package. Domainkeys identified mail adds a unique digital signature to every email you send, created with a private key only your server knows.

The receiving server uses your public key (published in DNS) to verify the seal hasn’t been broken. If the signature matches, your email is trusted as authentic and unaltered during transit.

🚀 DMARC (Domain-based Message Authentication, Reporting, and Conformance)

DMARC is the security chief who makes the final call. It looks at both SPF and DKIM results and enforces your predetermined policy. But here’s the crucial part—it also sends you detailed reports showing who’s sending emails from your domain.

DMARC adoption has increased by 200% over the past two years, yet 70% of businesses still don’t have it properly configured.

🎯 Avoid Technical Authentication Complexity

Our LinkedIn outbound engine targets, engages, and converts prospects without DNS configuration nightmares

Why are DKIM, SPF, and DMARC necessary? Let’s explore!

The Trust Factor That Controls Your Inbox Placement

Email providers process over 333 billion emails daily. Their algorithms rely heavily on sender reputation to decide inbox placement. Properly configured spf dkim authentication is the foundation of that reputation.

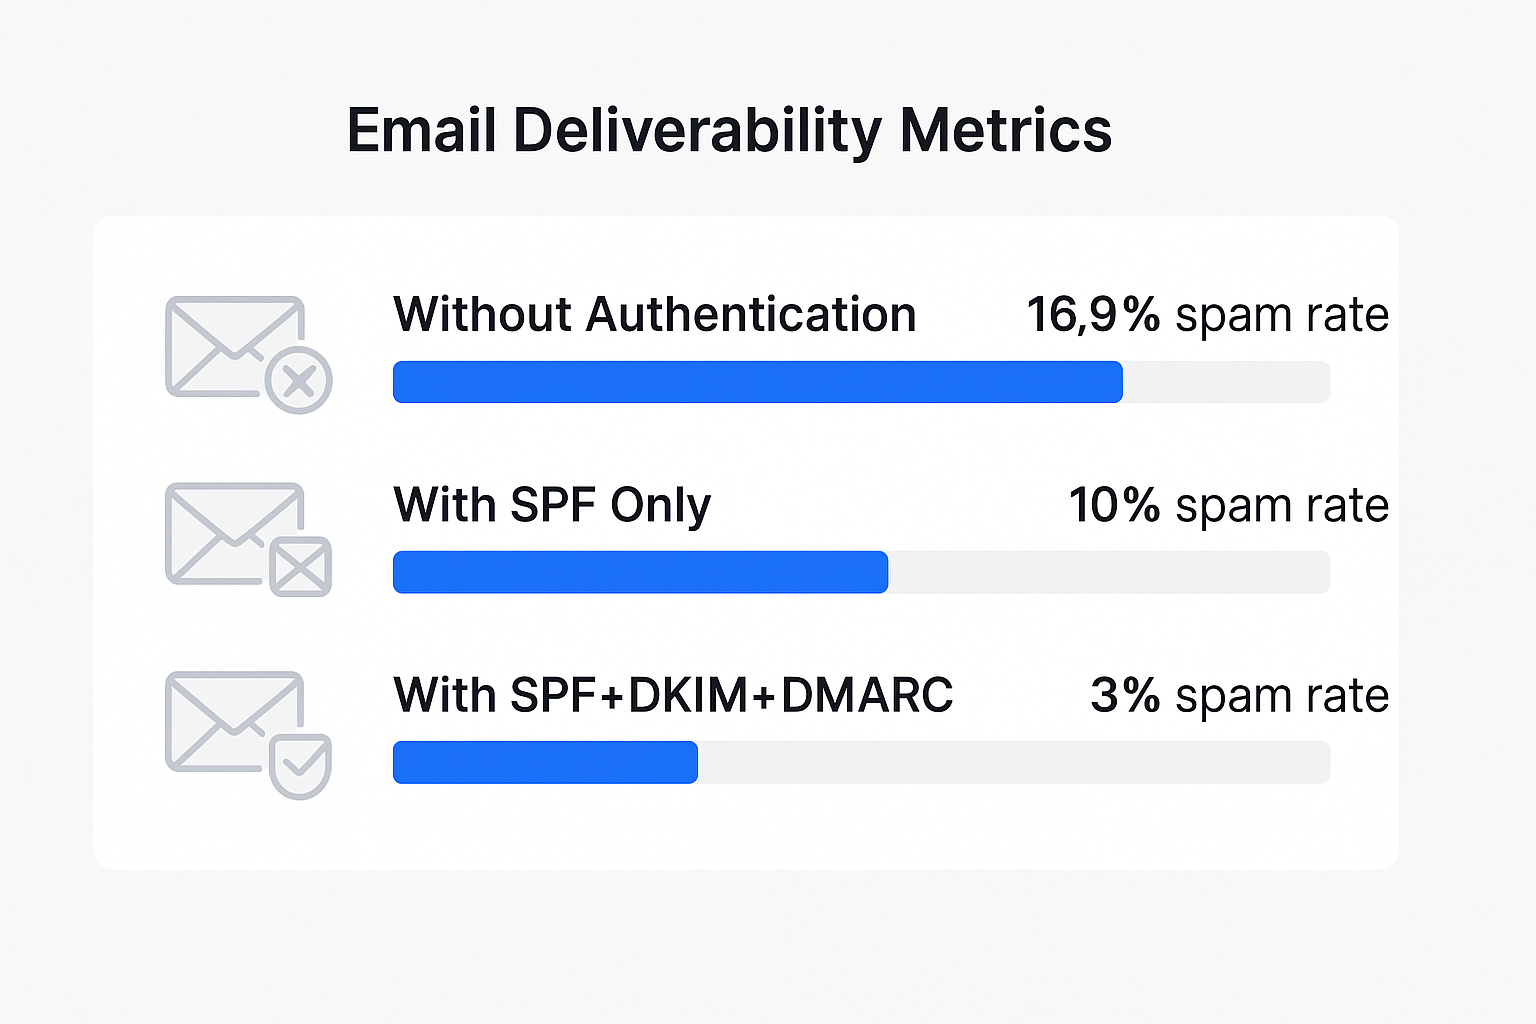
Industry data shows that domains with complete authentication see 10% higher deliverability rates with major providers. That’s thousands more emails reaching prospects each month.


Protection Against Domain Spoofing

Without authentication, anyone can send emails pretending to be your company. 3.4 billion phishing emails are sent daily, and if scammers use your domain, it destroys your sender reputation instantly.

The average cost of a data breach from email-based attacks has reached $4.88 million. Setting up dkim dmarc protection isn’t just about deliverability—it’s about protecting your business.

It’s Now Mandatory, Not Optional

As of 2024, Google and Yahoo require email authentication for anyone sending bulk emails (more than 5,000 messages per day). Even smaller senders are strongly encouraged to implement these protocols to avoid deliverability issues.

How to Set up DKIM, SPF, and DMARC: A Guide

DKIM, How to set it up?

📺 Video Guide: Most email providers offer visual setup guides in their admin panels.

🪜 Steps to Follow:

  1. Access your email provider’s admin console

    • Google Workspace: Admin Console > Apps > Gmail > Authenticate email
    • Microsoft 365: Admin Center > Exchange > Mail flow > Domains
  2. Generate your DKIM keys

    • Choose 2048-bit key length for maximum security
    • Your provider will generate a “selector” (like google._domainkey) and a long public key string
  3. Add the TXT record to your DNS

    • Host/Name: [selector]._domainkey.yourdomain.com
    • Value: The long DKIM public key provided
    • TTL: 3600 seconds (default)
  4. Enable DKIM in your email provider

    • Return to your admin console and activate DKIM signing
    • Changes may take up to 48 hours to propagate globally

Troubleshooting DKIM Setup Issues:

  • Key too long: Some DNS providers have character limits. Break long keys into multiple quoted strings.
  • Authentication still failing: Use an spf dkim record check tool like MXToolbox to verify your setup.
  • Propagation delays: DNS changes can take 24-48 hours. Be patient before testing.

SPF, How to set it up?


📺 Video Guide: Check your domain registrar’s help documentation for DNS management tutorials.

🪜 Steps to Follow:

  1. Identify all email sending sources

    • Your primary email provider (Google, Microsoft, etc.)
    • Marketing tools (Mailchimp, Klaviyo, etc.)
    • Sales tools and CRM systems
    • Any third-party services that send on your behalf
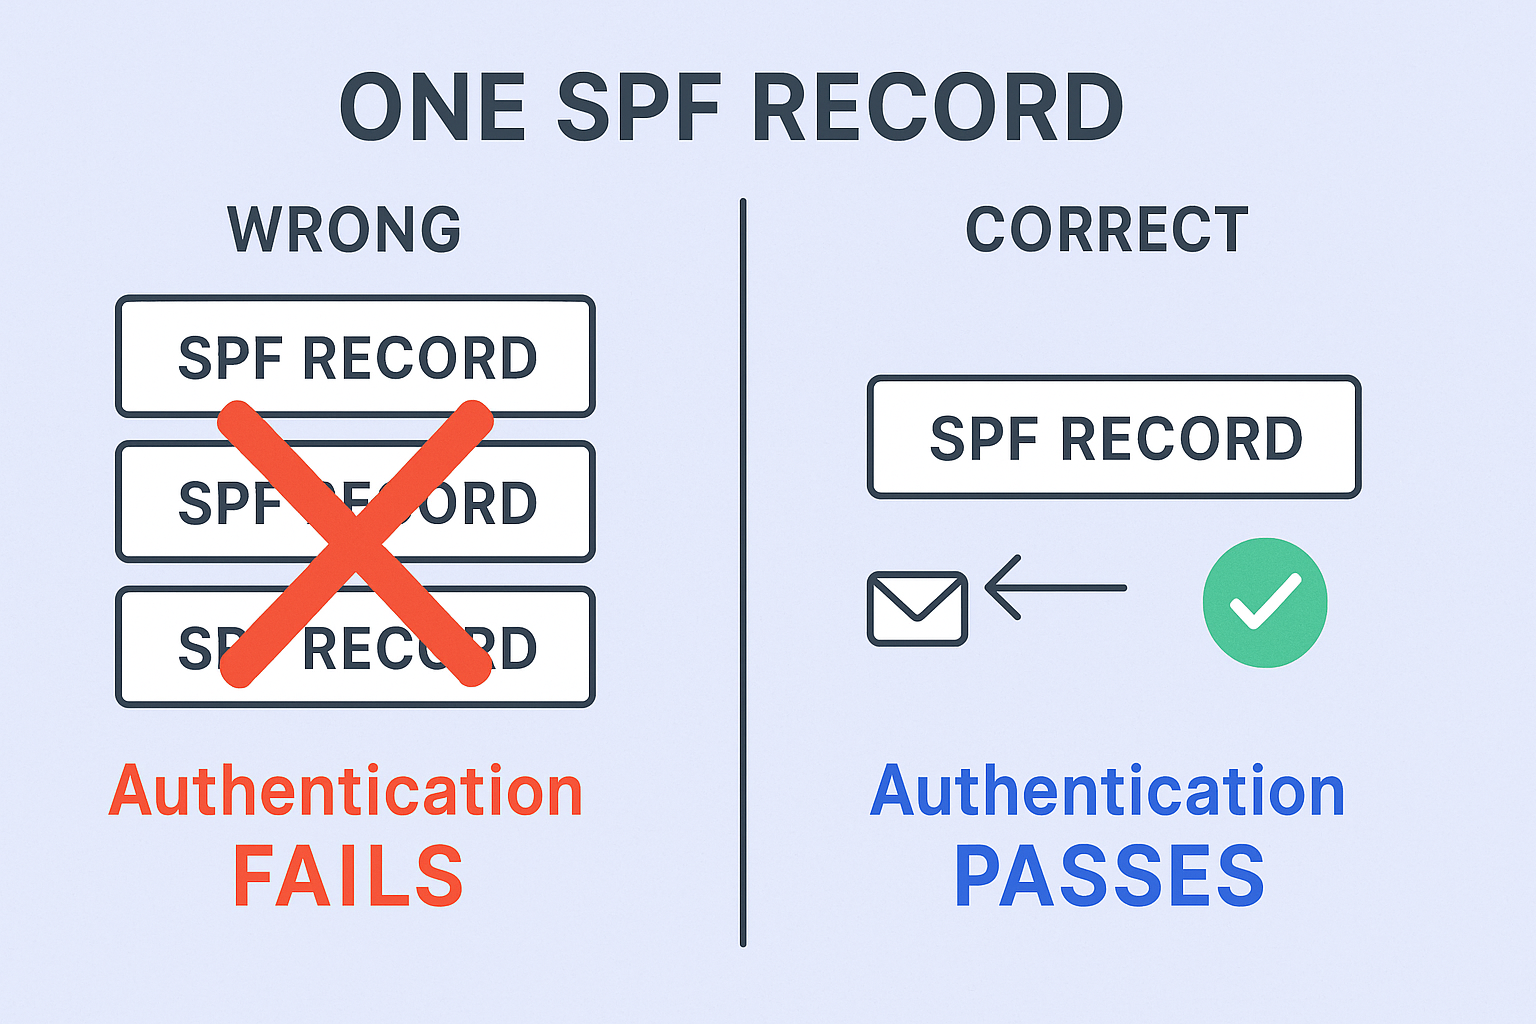
  2. Create your SPF record ⚠️ Critical Rule: Only ONE SPF record per domain

    Basic format: v=spf1 include:_spf.google.com ~all

    Common includes to add:

    • Google Workspace: include:_spf.google.com
    • Microsoft 365: include:spf.protection.outlook.com
    • Mailchimp: include:servers.mcsv.net
  3. Add TXT record to DNS

    • Host/Name: @ (represents your root domain)
    • Value: Your complete spf record
    • TTL: 3600 seconds
  4. Test your SPF record

    • Use online SPF validators to check syntax
    • Ensure you stay under the 10 DNS lookup limit
    • Verify all sending sources are included

DMARC, how to set it up?

📺 Video Guide: DMARC setup requires careful planning—video tutorials help visualize the phased approach.

🚀 Skip the 48-Hour Wait

LinkedIn campaigns launch in 24 hours with our complete targeting, creative, and scaling strategy

🪜 Steps to Follow:

Phase 1: Monitor Mode (Start Here)

  1. Create initial DMARC policy

    • Host/Name: _dmarc
    • Value: v=DMARC1; p=none; rua=mailto:dmarc-reports@yourdomain.com
    • This monitors all activity without blocking emails
  2. Set up report collection

    • Create a dedicated email address for DMARC reports
    • Reports arrive daily showing all authentication activity
    • Use DMARC analyzer tools to interpret data

Phase 2: Gradual Enforcement (After 2-4 weeks) 3. Analyze report data

  • Identify all legitimate sending sources
  • Look for authentication failures from your own systems
  • Spot potential spoofing attempts
  1. Upgrade to quarantine policy

    • Change to p=quarantine to send failing emails to spam
    • Monitor for any legitimate emails being affected
  2. Final step: Reject policy

    • Upgrade to p=reject for maximum protection
    • This blocks unauthenticated emails completely
    • Only do this when confident all legitimate sources pass

DMARC Policy Progression:

Policy

What It Does

When to Use

p=none

Monitor only, no enforcement

Starting point (weeks 1-4)

p=quarantine

Send failures to spam folder

Intermediate step (after analysis)

p=reject

Block failures completely

Final goal (maximum protection)

Before You Send Emails

Wait for DNS Propagation

Never send bulk emails immediately after DNS changes. Wait 48 hours for global propagation. Sending too early can damage your sender reputation.

💼 Ready to Scale Faster?

Our LinkedIn outbound system delivers qualified meetings from day one—no warm-up period required

7-day Free Trial |No Credit Card Needed.

Use Email Testing Tools

  1. Mail-Tester.com: Send a test email and get a deliverability score
  2. MXToolbox: Verify your spf dkim records are properly configured
  3. Google Postmaster Tools: Monitor your domain’s reputation with Gmail

Verify Authentication in Email Headers

Check any received email’s headers for:

  • spf=pass
  • dkim=pass
  • dmarc=pass

All three should show “pass” for proper authentication.

Start with Email Warm-up

Even with perfect authentication, new domains need gradual volume increases. Start with 50 emails per day and slowly increase over 2-3 weeks.

Key Takeaways for Email Authentication

Authentication is now mandatory. Major email providers require spf dkim dmarc for bulk senders. Without it, your emails simply won’t be delivered.

One SPF record per domain. This is the most common setup mistake. Multiple SPF records will cause authentication to fail completely.

Start DMARC with p=none. Always begin in monitoring mode to avoid accidentally blocking legitimate emails while you fine-tune your setup.

Test before sending. Use tools like mail-tester.com to verify your configuration before launching campaigns. A perfect 10/10 score should be your goal.

Monitor your reputation. Set up Google Postmaster Tools and monitor your email deliverability statistics regularly to catch issues early.

Be patient with DNS. Changes can take up to 48 hours to propagate worldwide. Rushing the process can harm your sender reputation.

Remember, proper email authentication isn’t just about following technical requirements—it’s about building trust with email providers and ensuring your messages reach the people who need them. With 16.9% of emails never reaching the inbox, can you afford not to have proper authentication?

The setup might seem technical, but the impact on your email success is immediate and measurable. Once configured, you’ll see higher delivery rates, better engagement, and most importantly, your emails will start landing in the primary inbox where they belong.

Whether you’re sending cold email campaigns, nurturing leads, or following up with prospects, proper authentication is your foundation for email success. Don’t let poor deliverability sabotage your outreach efforts—get your spf dkim records configured correctly, and watch your inbox placement rates soar.

Frequently Asked Questions

What happens if I don't set up SPF, DKIM, and DMARC?

Without proper authentication, your emails will likely land in spam folders or be rejected entirely by major email providers. Google and Yahoo have made authentication mandatory for bulk senders as of 2024.

Can I have multiple SPF records for one domain?

No, you can only have ONE SPF record per domain. Multiple SPF records will cause authentication to fail. Instead, add all your sending services to a single SPF record using multiple "include:" statements.

How long does it take for DNS changes to take effect?

DNS changes typically propagate within 24-48 hours globally. Some changes may be visible within minutes, but always wait the full 48 hours before testing email deliverability.

What's the difference between SPF and DKIM?

SPF verifies that the sending IP address is authorized for your domain, while DKIM verifies that the email content hasn't been tampered with during transit. Both are needed for complete authentication.

Should I start with DMARC policy p=reject immediately?

Never start with p=reject. Always begin with p=none (monitoring mode) for 2-4 weeks to understand your email ecosystem, then gradually move to p=quarantine and finally p=reject for maximum protection.

Skip Email Authentication Headaches

Get 10x better response rates with LinkedIn outbound—no SPF, DKIM, or DMARC setup required

Segmentation That Actually Converts

LinkedIn outbound targets precise demographics with strategic campaign design and scaling methods

How to Build a High-Converting B2B Sales Funnel from Scratch on LinkedIn ​